Table of Contents Best WooCommerce Product Filter Plugins Why Use WooCommerce Product Filters? Benefits of…
How to Add a Custom Field to WooCommerce Checkout Page

Table of Contents
- Why Add a Custom Field?
- Step 1: Add Custom Field Code
- Step 2: Validate Custom Field Data (Optional)
- Step 3: Save Custom Field Data
- Step 4: Display Custom Field Data on WooCommerce Thank You Page
- Step 5: Display Custom Field Data in Admin Order Details
- Step 6: Display Custom Field Data in WooCommerce Emails
- Code Snippet for Adding Custom Fields to WooCommerce Checkout Page
- Conclusion
- FAQ
Overview
Adding custom fields to your WooCommerce checkout page can enhance your store’s functionality. It allows you to gather more information from your customers. For example, you might need to collect additional details for shipping or offer special instructions. This guide will walk you through the process of adding a custom field to the checkout page.
Why Add a Custom Field?
There are several reasons to add a custom field:
- Collecting special instructions from customers
- Adding fields for personalized gifts
- Requesting additional information for order processing
Step 1: Add Custom Field Code
To add a custom field, you must insert some code into your functions.php file. You can access this file via your WordPress admin dashboard by navigating to Appearance > Theme Editor and selecting functions.php. Alternatively, you can use an FTP client or a local code editor.
Here’s a sample code snippet to add a custom text field:
// Add custom field to checkout page
//Add a Custom Field to WooCommerce Checkout Page
function custom_checkout_field( $checkout ) {
    echo '<div id="custom_checkout_field"><h2>' . __('Custom Information') . '</h2>';

    woocommerce_form_field( 'custom_field', array(
        'type'        => 'text',
        'class'       => array( 'custom-field-class form-row-wide' ),
        'label'       => __( 'Custom Field' ),
        'placeholder' => __( 'Enter custom information here' ),
        ), $checkout->get_value( 'custom_field' ));

    echo '</div>';
}
add_action( 'woocommerce_after_order_notes', 'custom_checkout_field' );
Step 2: Validate Custom Field Data (Optional)
If you want to validate the custom field data, use the following code:
// Validate custom field data
function custom_checkout_field_validate() {
    if ( empty( $_POST['custom_field'] ) ) {
        wc_add_notice( __( 'Please enter a value for the custom field.' ), 'error' );
    }
}
add_action( 'woocommerce_checkout_process', 'custom_checkout_field_validate' );
Step 3: Save Custom Field Data
To ensure the data from your custom field is saved with the order, add this code:
// Save custom field data
function custom_checkout_field_save( $order_id ) {
    if ( ! empty( $_POST['custom_field'] ) ) {
        update_post_meta( $order_id, '_custom_field', sanitize_text_field( $_POST['custom_field'] ) );
    }
}
add_action( 'woocommerce_checkout_update_order_meta', 'custom_checkout_field_save' );
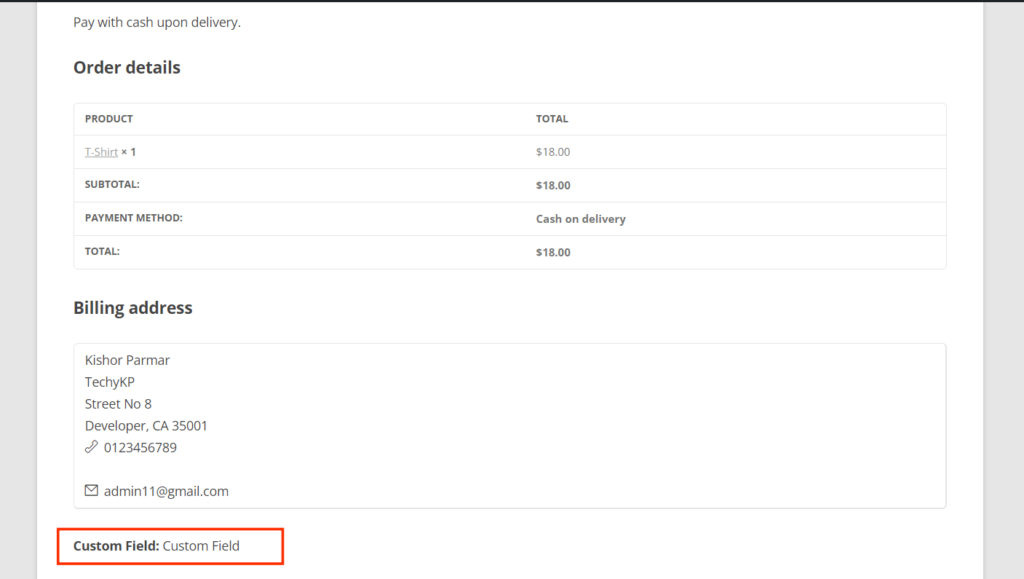
Step 4: Display Custom Field Data on WooCommerce Thank You Page
To display the custom field data on the WooCommerce Thank You page, use this code:

add_action( 'woocommerce_thankyou', 'custom_checkout_field_woocommerce_thankyou' );

function custom_checkout_field_woocommerce_thankyou( $order_id ) {
   if ( get_post_meta( $order_id, '_custom_field', true ) ) echo '<p><strong>Custom Field:</strong> ' . get_post_meta( $order_id, '_custom_field', true ) . '</p>';
}
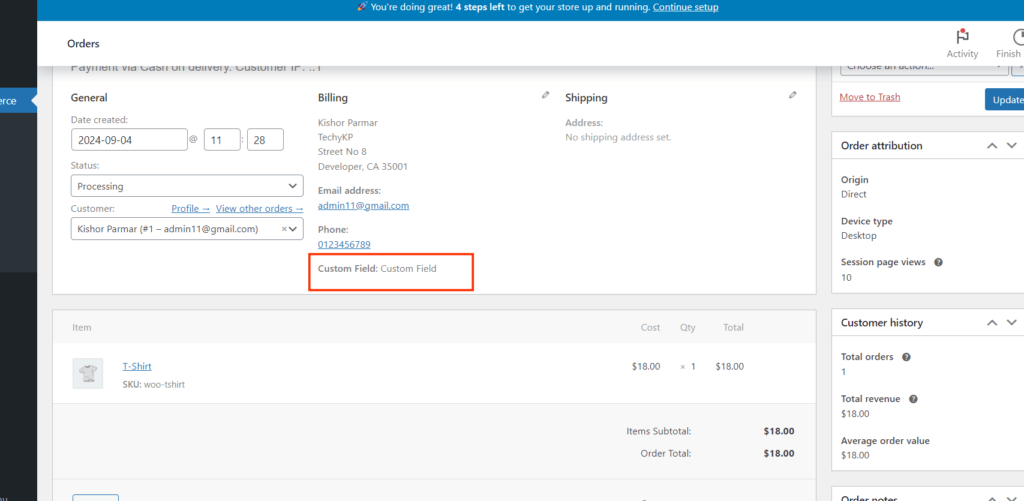
Step 5: Display Custom Field Data in Admin Order Details
To see the custom field data in the order admin panel, use this code:

// Display custom field data in admin order details
function custom_checkout_field_display_admin_order_meta($order){
    $custom_field = get_post_meta( $order->get_id(), '_custom_field', true );
    if ( ! empty( $custom_field ) ) {
        echo '<p><strong>' . __('Custom Field') . ':</strong> ' . $custom_field . '</p>';
    }
}
add_action( 'woocommerce_admin_order_data_after_billing_address', 'custom_checkout_field_display_admin_order_meta', 10, 1 );
Step 6 : Display Custom Field Data in WooCommerce Emails
To view the custom field data in WooCommerce emails, add this code:
add_action( 'woocommerce_email_after_order_table', 'custom_checkout_field_woocommerce_emails', 20, 4 );

function custom_checkout_field_woocommerce_emails( $order, $sent_to_admin, $plain_text, $email ) {
    if ( get_post_meta( $order->get_id(), '_custom_field', true ) ) echo '<p><strong>Custom Field:</strong> ' . get_post_meta( $order->get_id(), '_custom_field', true ) . '</p>';
}
Code Snippet for Adding Custom Fields to WooCommerce Checkout Page
// Add custom field to checkout page
function custom_checkout_field( $checkout ) {
    echo '<div id="custom_checkout_field"><h2>' . __('Custom Information') . '</h2>';
    woocommerce_form_field( 'custom_field', array(
        'type'        => 'text',
        'class'       => array( 'custom-field-class form-row-wide' ),
        'label'       => __( 'Custom Field' ),
        'placeholder' => __( 'Enter custom information here' ),
    ), $checkout->get_value( 'custom_field' ));
    echo '</div>';
}
add_action( 'woocommerce_after_order_notes', 'custom_checkout_field' );

// Validate custom field data
function custom_checkout_field_validate() {
    if ( empty( $_POST['custom_field'] ) ) {
        wc_add_notice( __( 'Please enter a value for the custom field.' ), 'error' );
    }
}
add_action( 'woocommerce_checkout_process', 'custom_checkout_field_validate' );

// Save custom field data
function custom_checkout_field_save( $order_id ) {
    if ( ! empty( $_POST['custom_field'] ) ) {
        update_post_meta( $order_id, '_custom_field', sanitize_text_field( $_POST['custom_field'] ) );
    }
}
add_action( 'woocommerce_checkout_update_order_meta', 'custom_checkout_field_save' );

// Display custom field data on WooCommerce Thank You page
add_action( 'woocommerce_thankyou', 'custom_checkout_field_woocommerce_thankyou' );
function custom_checkout_field_woocommerce_thankyou( $order_id ) {
    if ( get_post_meta( $order_id, '_custom_field', true ) ) {
        echo '<p><strong>Custom Field:</strong> ' . get_post_meta( $order_id, '_custom_field', true ) . '</p>';
    }
}

// Display custom field data in admin order details
function custom_checkout_field_display_admin_order_meta($order) {
    $custom_field = get_post_meta( $order->get_id(), '_custom_field', true );
    if ( ! empty( $custom_field ) ) {
        echo '<p><strong>' . __('Custom Field') . ':</strong> ' . $custom_field . '</p>';
    }
}
add_action( 'woocommerce_admin_order_data_after_billing_address', 'custom_checkout_field_display_admin_order_meta', 10, 1 );

// Display custom field data in WooCommerce emails
add_action( 'woocommerce_email_after_order_table', 'custom_checkout_field_woocommerce_emails', 20, 4 );
function custom_checkout_field_woocommerce_emails( $order, $sent_to_admin, $plain_text, $email ) {
    if ( get_post_meta( $order->get_id(), '_custom_field', true ) ) {
        echo '<p><strong>Custom Field:</strong> ' . get_post_meta( $order->get_id(), '_custom_field', true ) . '</p>';
    }
}
Conclusion
In summary, adding custom fields to your WooCommerce checkout page can greatly improve your store’s functionality. By following the steps outlined in this guide, you can collect valuable information from your customers, enhancing their shopping experience.
FAQ
Can I customize the type of field?
Yes! You can create text fields, checkboxes, dropdowns, and more by modifying the type in the woocommerce_form_field function.
Can I make custom fields mandatory?
Yes, by adding validation code as shown in Step 2, you can ensure customers fill in the required fields before completing their orders.
Will adding custom fields affect checkout speed?
If implemented properly, the impact on checkout speed should be minimal. However, too many custom fields might slow down the process, so it’s best to keep only essential fields.
How do I access the custom field data later?
You can retrieve the custom field data using get_post_meta($order_id, '_custom_field', true); in your code, where $order_id is the ID of the order.
Can I use multiple custom fields?
Absolutely! You can replicate the provided code for additional fields. Just ensure that each field has a unique name and ID.
Will custom fields show up on the admin panel?
Yes, if you include the code for displaying custom fields in the admin order details, you will see the custom field data for each order in the WooCommerce admin panel.


This Post Has 0 Comments