Table of Contents Best WooCommerce Product Filter Plugins Why Use WooCommerce Product Filters? Benefits of…
How to Add Custom Fields to the WooCommerce Registration Form

Table of Contents
- Overview
- Enable the Customer Registration Option
- Method 1: Using WooCommerce Hooks
- Method 2: Using Plugins
- Redirecting After Registration
- Testing and Troubleshooting
- Conclusion
- FAQ
Overview
WooCommerce offers a basic registration form that works well for most users. However, in some cases, you may need to customize the WooCommerce registration form to collect additional information or tailor it to your business needs. Adding custom WooCommerce registration form custom fields (such as a phone number field) is one common customization. Whether you’re adding fields for a custom user registration or modifying the default registration flow, this guide will show you how to edit the WooCommerce registration form and add extra fields.
Enable the Customer Registration Option
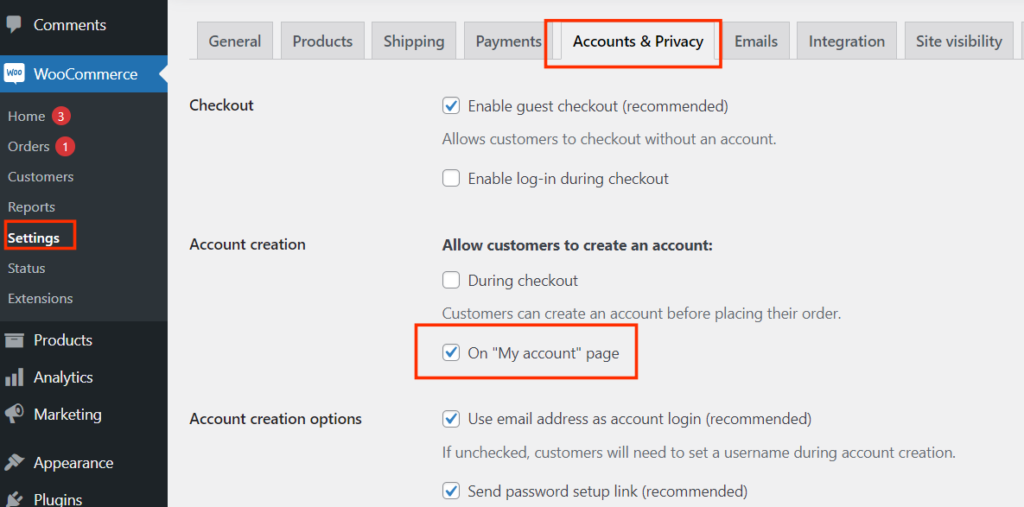
Before customizing your WooCommerce registration form, make sure customer registration is enabled on the WooCommerce registration page. Here’s how to enable it:

- Log in to Your WordPress Admin Dashboard
Access your WordPress admin dashboard using your administrator credentials. - Navigate to WooCommerce Settings
Go to WooCommerce in the left-hand menu and click on Settings. - Open the Accounts & Privacy Tab
Click on the Accounts & Privacy tab to access account-related settings. - Enable Customer Registration on the “My Account” Page
In the Account Creation section, check the box labeled Enable Customer Registration on the “My Account” page. This option allows users to create accounts on the “My Account” page. - Save Changes
Click the Save changes button at the bottom of the page to apply your settings.
Method 1 : Using WooCommerce Hooks
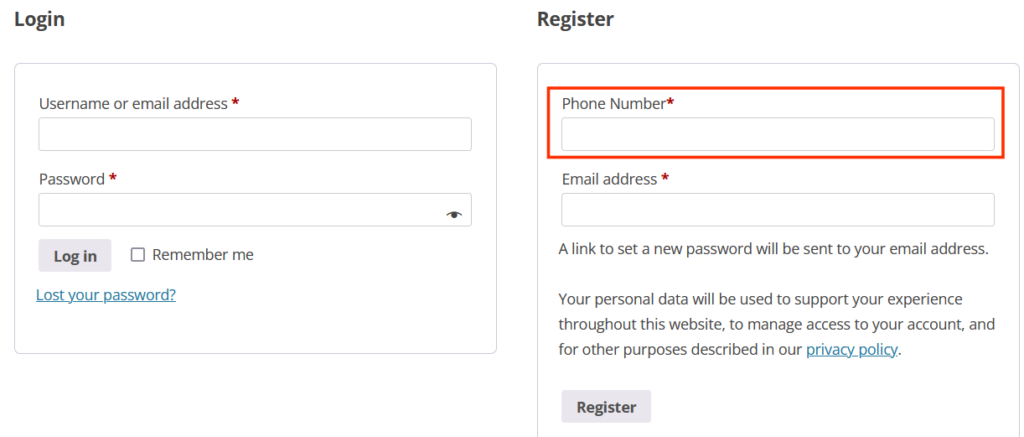
One of the most common ways to add custom fields for registration is by using WooCommerce hooks. For instance, adding a phone number field to the WooCommerce customer registration form can be done as follows:

Adding the Field
Use the woocommerce_form_field function to create a custom field. For example, to add a text field for a user’s phone number, you might use the following code:
// Add custom field to registration form
add_action('woocommerce_register_form_start', 'codebykp_custom_registration_field');

function codebykp_custom_registration_field() {
    ?>
    <p class="form-row form-row-wide">
        <label for="billing_phone"><?php _e('Phone Number', 'woocommerce'); ?><span class="required">*</span></label>
        <input type="text" class="input-text" name="billing_phone" id="billing_phone" />
    </p>
    <?php
}
This code snippet adds a phone number field to the custom WooCommerce registration form. You can modify this to add other fields as required.
List of WooCommerce Form Fields for Registration and Billing
In the default WooCommerce registration form, customers enter their username, email, and password. However, you can customize WooCommerce registration fields to include additional information such as a phone number, company name, or shipping address. The billing section typically includes:
WooCommerce Registration Form Fields
username: The username the user selects for their account.email: The email address the user provides.password: The password the user sets for their account.
WooCommerce Billing Address Fields
billing_first_name: The user’s first name.billing_last_name: The user’s last name.billing_company: The company name (if applicable).billing_address_1: The primary address line.billing_address_2: The secondary address line (optional).billing_city: The city for the billing address.billing_postcode: The postal or ZIP code.billing_country: The country for the billing address.billing_state: The state or province.billing_email: The email address for billing purposes.billing_phone: The phone number associated with the billing address.
Validating the Custom Field:
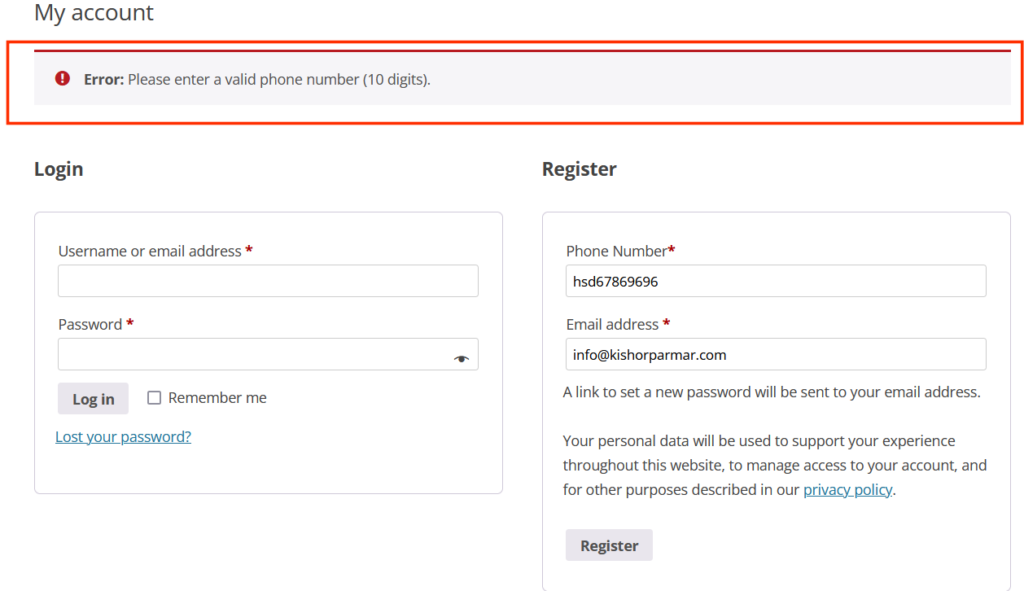
Once you’ve added custom fields like the phone number field, you should validate them. Here’s an example of how to validate the phone number:

// Validate custom field data
add_filter('woocommerce_registration_errors', 'codebykp_validate_custom_registration_field', 10, 3);

function codebykp_validate_custom_registration_field($errors, $username, $email) {
    if (empty($_POST['billing_phone']) || !preg_match('/^[0-9]{10}$/', $_POST['billing_phone'])) {
        $errors->add('phone_number_error', __('Please enter a valid phone number (10 digits).', 'woocommerce'));
    }
    return $errors;
}
This checks if the phone number is valid and adheres to the format you require. Use the woocommerce_registration_errors hook to add these validations.
In this example, the validation checks if the phone number is empty or does not match a 10-digit pattern. You can adjust the regular expression to fit your requirements.
Saving Custom Field Data:
If the validation passes, save the custom field data as previously shown:
// Save custom field data
add_action('woocommerce_created_customer', 'codebykp_save_custom_registration_field');

function codebykp_save_custom_registration_field($customer_id) {
    if (isset($_POST['phone_number'])) {
        update_user_meta($customer_id, 'billing_phone', sanitize_text_field($_POST['billing_phone']));
    }
}
Combined Code for Customizing WooCommerce Registration Form:
Here are the combine code :
// Add Custom Phone Number Field to WooCommerce Registration Form
add_action('woocommerce_register_form_start', 'add_custom_registration_field');
function add_custom_registration_field() {
    ?>
    <p class="form-row form-row-wide">
        <label for="billing_phone"><?php _e('Phone Number', 'woocommerce'); ?><span class="required">*</span></label>
        <input type="text" class="input-text" name="billing_phone" id="billing_phone" />
    </p>
    <?php
}

// Validate the Custom Phone Number Field
add_filter('woocommerce_registration_errors', 'validate_custom_registration_field', 10, 3);
function validate_custom_registration_field($errors, $username, $email) {
    // Check if phone number is empty or does not match the 10-digit pattern
    if (empty($_POST['billing_phone']) || !preg_match('/^[0-9]{10}$/', $_POST['billing_phone'])) {
        $errors->add('phone_number_error', __('Please enter a valid phone number (10 digits).', 'woocommerce'));
    }
    return $errors;
}

// Save Custom Phone Number Field Data
add_action('woocommerce_created_customer', 'save_custom_registration_field');
function save_custom_registration_field($customer_id) {
    // Save the phone number to user meta after successful registration
    if (isset($_POST['billing_phone'])) {
        update_user_meta($customer_id, 'billing_phone', sanitize_text_field($_POST['billing_phone']));
    }
}

// Redirect After Registration
add_filter('woocommerce_registration_redirect', 'custom_redirect_after_registration');
function custom_redirect_after_registration($redirect_url) {
    // Redirect users to the "Thank You" page after registration
    return home_url('/thank-you-for-registering');
}
Explanation of Code:
- Add Custom Phone Number Field:
- This part adds a custom phone number field to the WooCommerce registration form using the
woocommerce_register_form_startaction hook. It will be displayed on the registration form.
- This part adds a custom phone number field to the WooCommerce registration form using the
- Validate the Phone Number:
- The
woocommerce_registration_errorsfilter is used to validate the phone number field. If the phone number is not provided or doesn’t match the 10-digit format, an error message is added to inform the user.
- The
- Save Custom Phone Number Field Data:
- After successful registration, the custom phone number field is saved to the user’s meta data using the
woocommerce_created_customeraction hook. The phone number is sanitized and stored in thebilling_phonefield.
- After successful registration, the custom phone number field is saved to the user’s meta data using the
- Redirect After Registration:
- The
woocommerce_registration_redirectfilter is used to redirect users to a custom page (e.g., a “Thank You” page) after they complete the registration process. This ensures users are taken to a specific page rather than staying on the default WooCommerce page.
- The
Method 2 : Using Plugins to Customize WooCommerce Registration Form
If you’d rather not edit code, you can use a WooCommerce registration fields plugin like User Registration for WooCommerce. This plugin provides an easy interface to add custom user registration fields for WooCommerce, including fields like phone numbers, custom addresses, and more.
This plugin provides an interface for adding custom fields and includes validation options:
Steps to Use the Plugin:
- Install and activate the plugin via Plugins > Add New.
- Navigate to WooCommerce > User Registration > Add New Field.
- Customize the fields, set validation rules, and configure the field settings.
With this plugin, you can easily edit the WooCommerce registration form without writing any code.
Redirecting After Registration
After customizing the registration form, you might want to redirect users after registration. WooCommerce allows you to use the woocommerce_registration_redirect filter to send users to a specific page after they register. Here’s how:
add_filter('woocommerce_registration_redirect', 'custom_redirect_after_registration');

function custom_redirect_after_registration($redirect_url) {
    return home_url('/thank-you-for-registering');
}
This will redirect users to a “Thank You” page after completing the WooCommerce customer registration process.
Testing and Troubleshooting
Once you’ve added custom fields and made other modifications, test the WooCommerce registration form to ensure everything works correctly:
- Test custom fields: Ensure that all custom fields (such as the phone number or address) appear on the form and are validated properly.
- Check error messages: Make sure error messages, such as for invalid phone numbers, are clear and user-friendly.
- Verify data storage: Ensure that the data is saved properly in the WooCommerce customer registration system.
Conclusion
Customizing your WooCommerce registration form allows you to collect more detailed customer information, such as a phone number or custom address fields. Whether you use hooks to add custom fields or opt for a plugin, you can easily create a custom WooCommerce registration form tailored to your business needs. By validating and redirecting users after registration, you can further enhance the user experience.
For more tips on how to customize WooCommerce registration forms, subscribe to our blog and stay up-to-date on the latest WooCommerce features!
FAQ
How can I enable customer registration in WooCommerce?
To enable customer registration, log in to your WordPress admin dashboard. Navigate to WooCommerce > Settings, then click on the Accounts & Privacy tab. Check the box labeled Enable Customer Registration on the “My Account” page and click Save changes.
How do I add custom fields to the WooCommerce registration form?
You can add custom fields using the woocommerce_form_field function in your theme’s functions.php file. For example, to add a phone number field, use the provided code snippet.
Can I customize error messages for validation?
Yes, you can customize error messages by modifying the code in the validation function. Ensure that the messages are clear and helpful for users.
Is it necessary to back up my site before making changes?
Yes, always back up your site before making any changes to the code or adding new plugins. This ensures you can restore your site if anything goes wrong.


This Post Has 0 Comments