Table of Contents Overview Ultimate Auction Pro Auctions Made Easy for WooCommerce Auctions for WooCommerce…
How to Install a WordPress Theme: Complete Installation Guide for Beginners
Table of Contents
- Overview
- Step 1: Choose the Right Theme for Your Website
- Step 2: Install the Theme
- Step 3: Activate the Theme
- Step 4: Customize Your Theme Settings
- Step 5: Install Necessary Plugins
- Step 6: Add Content and Pages
- Step 7: Preview and Publish Your Site
- Troubleshooting Common Issues
- Conclusion
- Additional Resources
- FAQ
Overview
If you’re new to WordPress, setting up your website with the right theme is a crucial first step. A good theme not only gives your website a professional appearance but also enhances its performance. In this easy-to-follow guide, we’ll walk you through every step to install and set up a WordPress theme.
Step 1: Choose the Right Theme for Your Website
Before diving into the installation process, the first task is to pick a theme. WordPress offers thousands of options, both free and premium. Here’s what you need to know:
Free Themes
- Free themes are available directly from the WordPress dashboard.
- These are great for beginners, offering basic features and a simple setup.
- You can explore and install them easily without any cost.
Premium Themes
- Premium themes often come with advanced features and extra support.
- You can purchase them from trusted providers like ThemeForest, Elegant Themes, or StudioPress.
- These themes usually offer more customization options, higher quality designs, and are optimized for performance.
Tip: When selecting a theme, think about your website’s purpose (blog, business, portfolio, eCommerce) and pick one that suits your style and goals.
Step 2: Install the Theme
Once you’ve picked a theme, it’s time to install it. The installation process is quick and straightforward. Follow these steps:
- Log in to your WordPress Dashboard: Visit
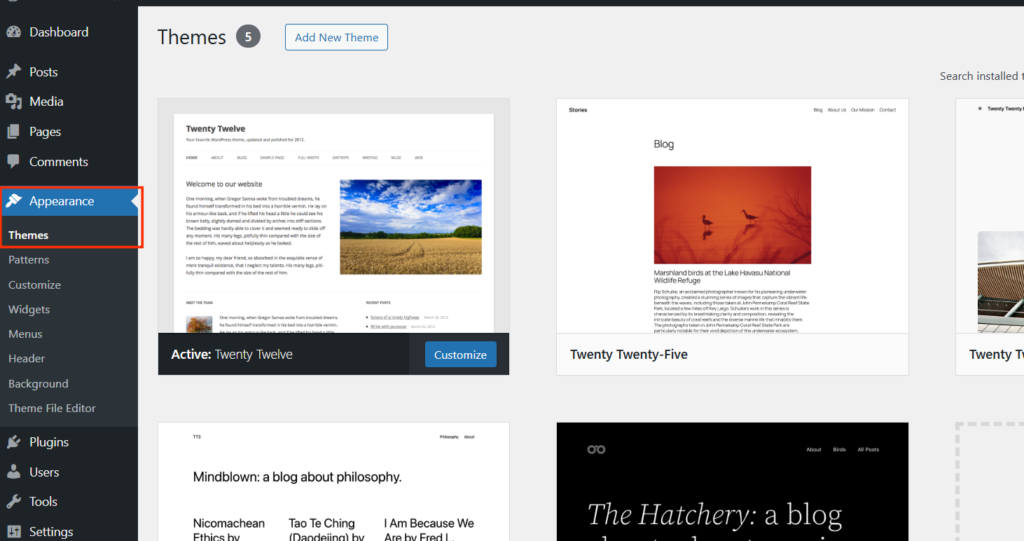
yourwebsite.com/wp-adminand log in with your credentials. - Go to Appearance > Themes: On the left sidebar, navigate to Appearance and then select Themes.
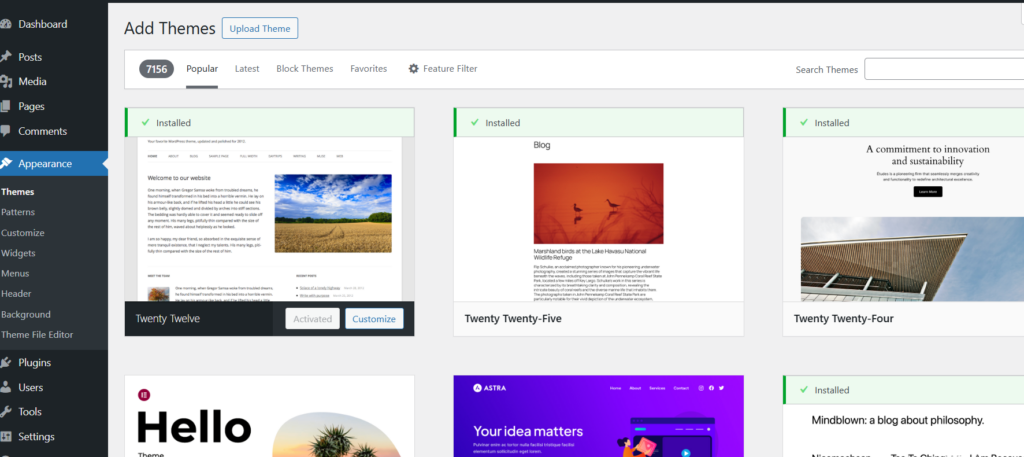
- Click ‘Add New’: At the top of the page, you’ll see the Add New button—click it to browse for themes.
Installing Free Themes:
- In the search bar, type the name of your theme.
- Click Install when you find it, then hit Activate once the installation is complete.
Installing Premium Themes:
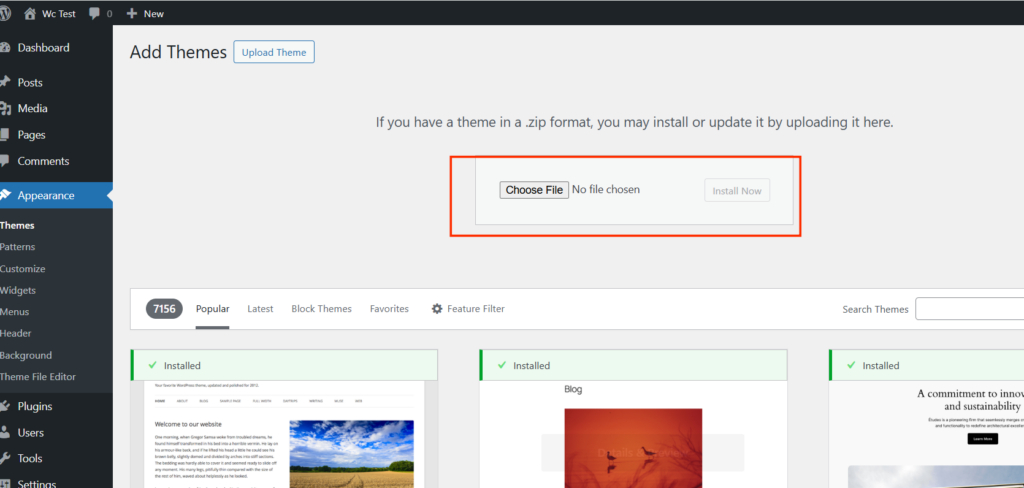
- If you purchased a theme, click Upload Theme at the top.
- Click Choose File, select the theme’s .zip file you downloaded, and click Install Now.
- Once installed, click Activate.
Step 3: Activate the Theme
Activating your theme makes it live on your site. Here’s how:
- Go back to Appearance > Themes.
- Find your newly installed theme and click Activate.
Once activated, your website will display this theme.
Step 4: Customize Your Theme Settings
Now that your theme is live, it’s time to make it your own. Customization is key to creating a website that reflects your brand. Here’s how to get started:
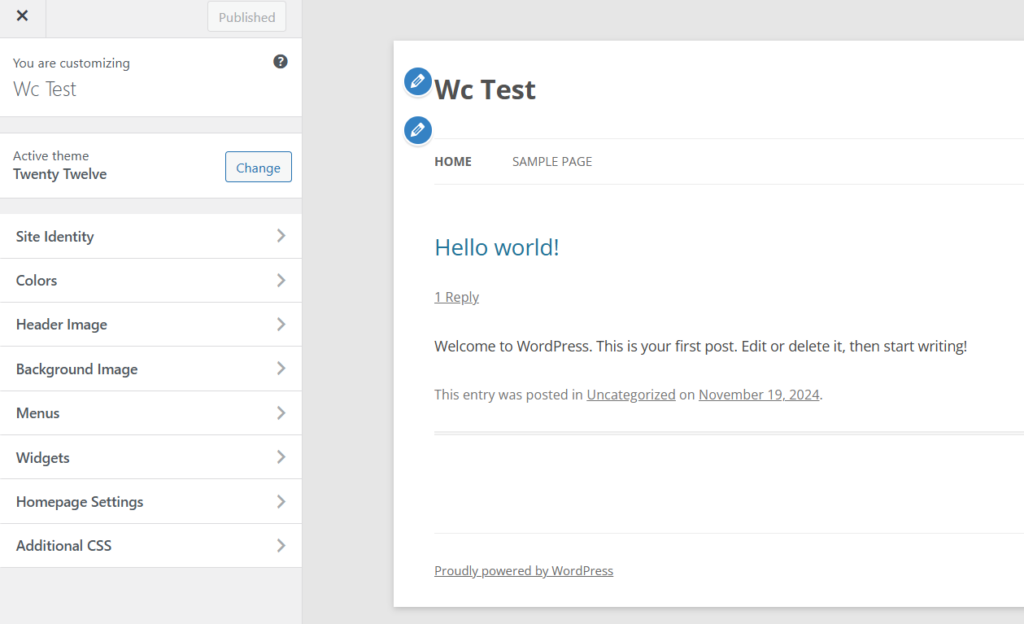
- Go to Appearance > Customize: This opens the WordPress Customizer.
- Explore and adjust the following options, depending on your theme:
- Site Identity: Set your site title, tagline, and logo.
- Colors and Fonts: Choose colors and typography that match your brand.
- Layout: Modify the layout, including the header, footer, and sidebar settings.
- Widgets: Add widgets for extra functionality, like a search bar or social media links.
Each theme offers different customization options, so take your time to explore the settings.
Step 5: Install Necessary Plugins
Some themes work best with specific plugins to enhance your site’s functionality. It’s a good idea to check the theme documentation for recommended plugins. Here are a few common plugins to install:
- Yoast SEO: Helps optimize your site for search engines.
- WP Super Cache: Improves site speed by caching content.
- Wordfence: Adds security features to protect your site.
- Jetpack: Offers additional performance and security tools.
To install plugins:
- Go to Plugins > Add New.
- Search for the plugin by name.
- Click Install Now, then click Activate.
Step 6: Add Content and Pages
With your theme customized and essential plugins installed, it’s time to add content to your website. Here are some key pages to include:
- Home Page: The main page visitors will land on.
- About Page: Tell people who you are and what your website is about.
- Contact Page: Provide a way for visitors to get in touch with you.
- Blog Page (if applicable): For regular posts and updates.
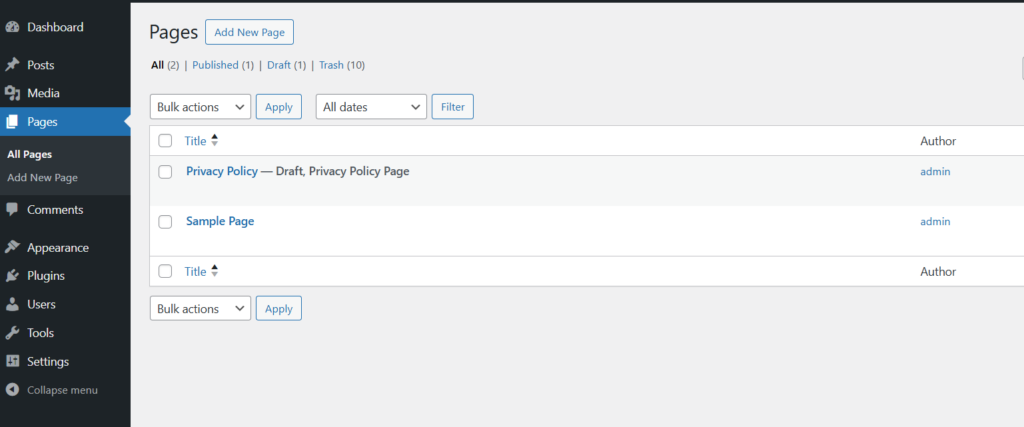
How to Add Pages:
- Go to Pages > Add New.
- Enter the page title and content.
- Once done, click Publish.
Step 7: Preview and Publish Your Site
Before making your site public, take a moment to preview everything:
- Preview: In the WordPress Customizer, click the Preview button to see how your site looks on different devices (desktop, tablet, mobile).
- Final Check: Ensure your content is aligned, the colors are perfect, and all links are working.
- Publish: Once you’re satisfied with the look and feel, click Publish to make your site live.
Troubleshooting Common Issues
Sometimes, things don’t go exactly as planned. Here are some common issues and solutions:
- Theme Doesn’t Look Like Demo: Some themes have demo content you can import. Check the theme’s documentation for instructions.
- Missing Theme Options: Make sure all required plugins are installed and activated.
- Website Not Loading Properly: Try clearing your browser cache or disable caching plugins temporarily.
Conclusion
Congrats! You’ve successfully installed and set up your WordPress theme. By following this guide, you now have a fully functional and visually appealing website. Don’t forget that you can always tweak and improve your site as you go along.
Remember, building a great website takes time. As you grow, feel free to update your theme, install new plugins, and add fresh content to keep things exciting!
Additional Resources
- WordPress Theme Directory: Explore free themes here.
- Beginner’s Guide to WordPress Themes: Learn more about themes here.
FAQ
Can I change my WordPress theme later?
Yes, you can switch themes anytime. However, switching themes may affect your website’s design and functionality, so always preview and back up your site before making changes.
Do I lose content when changing themes?
No, your content (posts, pages, and media) remains intact when you change themes. However, theme-specific settings, customizations, or features may not carry over.
Can I customize a theme without coding?
Absolutely! Most WordPress themes allow customization through the WordPress Customizer or their own settings panel, enabling you to adjust colors, fonts, layouts, and more without touching any code.
Can I use multiple themes on the same WordPress site?
No, you can only activate one theme at a time. However, you can use different themes for specific sections by using plugins or custom coding.
Are free themes safe to use?
Yes, free themes from the WordPress repository are safe as they’re reviewed for quality and security. Avoid downloading themes from unverified sources.




This Post Has 0 Comments