Table of Contents Best WooCommerce Product Filter Plugins Why Use WooCommerce Product Filters? Benefits of…
How to Add Custom Product Tabs in WooCommerce Website
Table of Contents
- Overview
- Method 1: Manually Adding Custom Tabs (Advanced Way)
- Method 2: Using a Plugin
- Troubleshooting Common Issues
- Conclusion
- FAQ
Overview:
In the world of e-commerce, product pages are crucial for converting visitors into customers. One effective way to enhance these pages is by adding custom product tabs in WooCommerce. Custom product tabs allow you to provide additional information, such as product specifications, reviews, or related articles, making your product pages more informative and engaging. In this guide, we’ll walk you through the steps to add custom product tabs for WooCommerce to your website, helping improve both user experience and SEO.
Method 1 : Manually Adding Custom Tabs (Advanced Way)
For users with coding knowledge, you can add custom product tabs manually by modifying your theme’s functions.php file. Here’s how:
Access Your Theme Files
- Connect to your WordPress site via FTP or use the file manager in your hosting control panel.
- Navigate to wp-content/themes/your-theme/.
Edit functions.php File
Open the functions.php file in a text editor.
Add Custom Tab Code
Insert the following code to create a custom tab:
// Add custom tab
function codebykishor_custom_product_tabs($tabs) {
    $tabs['custom_tab'] = array(
        'title'    => __('Custom Tab', 'text-domain'),
        'priority' => 50,
        'callback' => 'codebykishor_custom_tab_content',
    );
    return $tabs;
}
add_filter('woocommerce_product_tabs', 'codebykishor_custom_product_tabs');

// Custom tab content
function codebykishor_custom_tab_content() {
    // Add your custom tab content here
    echo '<p>This is the custom tab content.</p>';
}
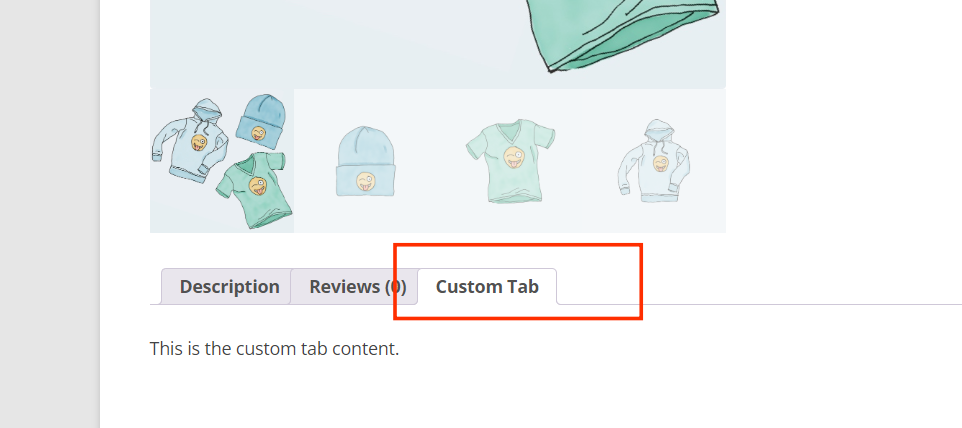
This code adds a custom product tab named “Custom Tab.” You can customize the title, priority, and content as needed.
Customizing the Appearance of Tabs
To further customize the look and feel of your custom product tabs:
- Use CSS: Go to Appearance > Customize > Additional CSS and insert your styles to change the appearance of the tabs.
- Modify Tab Templates: For advanced customization, copy the
woocommerce/templates/single-product/tabs/tabs.phpfile to your theme folder and modify it.
Method 2: Using a Plugin
Using a plugin is the easiest way to add custom product tabs to your WooCommerce store. Here are the benefits:
- User-Friendly: No coding required.
- Time-Saving: Quick installation and setup.
Step-by-Step Instructions:
- Go to your WordPress dashboard.
- Navigate to Plugins > Add New.
- Search for the desired plugin from the list below and install it.
Plugin Options:
1. WooCommerce Product Tabs
This free plugin allows you to easily add additional tabs to your product pages. It’s an excellent option for users who need a simple, no-cost solution.
- Install and Activate: Go to Plugins > Add New, search for “WooCommerce Product Tabs”, click Install Now, and then Activate.
- Configure: After activation, you’ll find a new tab labeled Product Tabs in your product edit page, where you can add or manage your custom tabs.
2. Custom Product Tabs for WooCommerce (Free)
This is another free option for adding custom product tabs. It offers flexibility and allows you to add custom content easily without any coding.
- Install and Activate: Search for “Custom Product Tabs for WooCommerce” in the WordPress plugins directory, click Install Now, and then Activate.
- Configure: Go to the product edit page to find the Custom Tabs section where you can add, edit, or remove tabs.
3. Custom Product Tabs Manager for WooCommerce (Paid)
This paid plugin offers advanced features for managing custom product tabs. It gives you more control over your tabs, including setting conditions for when and where tabs appear, as well as options for customizing tab layout and design.
- Install and Activate: Purchase the plugin from the official website or WordPress plugin store, then install and activate it from the Plugins > Add New section.
- Configure: Similar to the other plugins, you’ll find a new tab on the product page to create and manage your custom product tabs.
Configure Custom Product Tabs
Once the plugin is activated, you can begin configuring your custom product tabs:
- Go to the product edit page.
- You’ll see a new section for Custom Product Tabs or Product Tabs (depending on the plugin).
- Here, you can easily add, edit, or delete tabs.
- Explore additional options like priority and display settings.
Troubleshooting Common Issues
- Tab Not Appearing: Check for conflicts with other plugins or themes.
- Content Formatting Issues: Ensure your content is properly styled.
- Code Errors: Double-check that your custom code is correctly added and error-free.
Tip: Always test code changes on a staging site or back up your files before making modifications.
Conclusion
Adding custom product tabs for WooCommerce to your website can significantly enhance the user experience, providing additional value to your customers. Whether you choose a plugin like Custom Product Tabs Pro or prefer the manual coding route, you now have the tools to make your product pages more informative and engaging. For those seeking a WooCommerce product tabs manager, plugins like Custom Product Tabs for WooCommerce can help streamline the process. If you encounter issues, consult WooCommerce documentation or seek help from the community.
FAQ
What are custom product tabs?
Custom product tabs allow you to display additional information on your product pages, such as specifications and reviews.
Do I need coding knowledge to use a plugin?
No, plugins are designed to be user-friendly and do not require coding skills.
Can I customize the appearance of my tabs?
Yes, you can use CSS to style your tabs and modify templates for advanced customization.
What should I do if my tab doesn’t appear?
Check for conflicts with other plugins or themes and ensure your settings are correct.


This Post Has 0 Comments