Table of Contents Overview Ultimate Auction Pro Auctions Made Easy for WooCommerce Auctions for WooCommerce…
How to Add Custom Fonts to Your WordPress Site

Table of Contents
- Introduction
- Why Use Custom Fonts?
- Methods to Add Custom Fonts in WordPress
- Tips for Choosing Custom Fonts
- Final Thoughts
Overview
Typography plays a key role in web design, helping you set the tone and make your website visually appealing. WordPress offers built-in fonts, but sometimes you need unique typography to match your brand or design vision. In this tutorial, we will walk you through how to add custom fonts to your WordPress site in a few easy steps.
Whether you’re a designer or developer, this guide will help you make your site’s typography stand out.
Why Use Custom Fonts?
Custom fonts allow you to:
- Improve your website’s appearance and style.
- Align typography with your brand identity.
- Enhance readability and user experience.
- Make your site unique and professional.
By adding custom fonts, you can move beyond default options and create a site that looks modern and engaging.
Methods to Add Custom Fonts in WordPress
Here are four easy ways to add custom fonts to your WordPress site:
- Using a WordPress Plugin
- Manually Adding Custom Fonts with CSS
- Embedding Google Fonts
- Adding Custom Fonts via the functions.php File
We will explain each method step by step.
1. Using a WordPress Plugin
The easiest way to add custom fonts is by using a plugin. Follow these steps:
Step 1: Install and Activate a Font Plugin
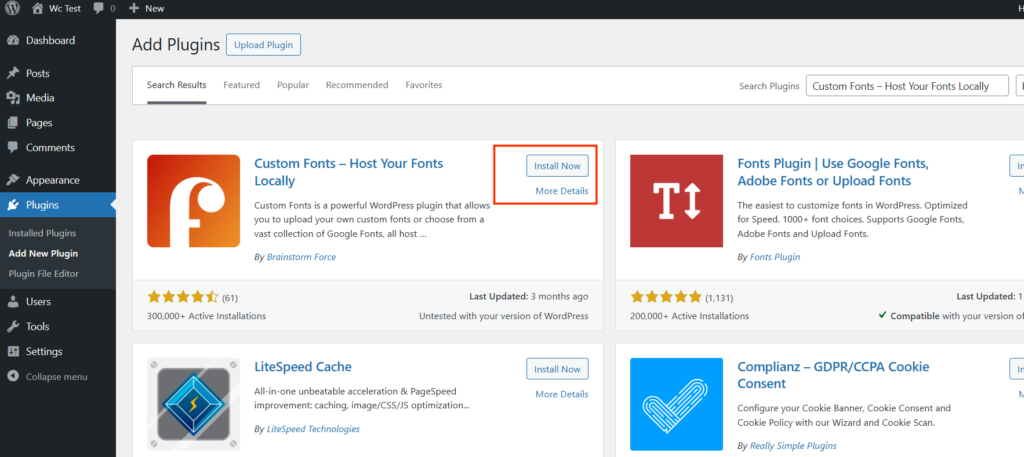
- Go to your WordPress Dashboard.
- Navigate to Plugins > Add New.
- Search for a plugin like “Custom Fonts”.
- Click Install Now and then Activate.

Step 2: Upload or Choose Your Fonts
- Once activated, go to Appearance > Customize.
- Look for the plugin’s font settings or options.
- Upload your custom font files (like
.woff,.ttf, or.otf) or select fonts from the plugin’s library.
Step 3: Apply the Custom Fonts
- In the Customizer, go to Typography or Fonts settings.
- Select your custom fonts for headings, body text, and other elements.
- Save your changes.
This method is quick, beginner-friendly, and doesn’t require coding knowledge.
2. Manually Adding Custom Fonts with CSS
If you prefer more control, you can manually upload and add fonts using CSS. Here’s how:
Step 1: Upload the Font Files
- Download your custom font files (ensure they are web-safe formats like
.woffor.woff2). - Upload the font files to your WordPress theme’s
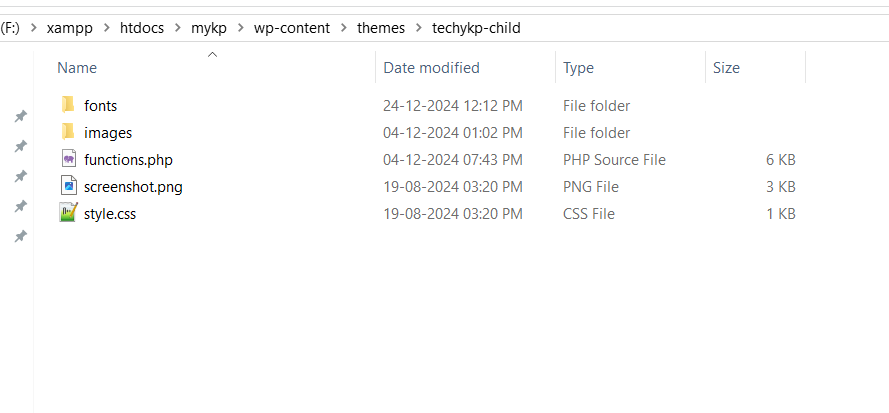
/fontsfolder via FTP or the File Manager.- Path:
wp-content/themes/your-theme/fonts/
- Path:

Step 2: Add the Font to Your CSS
- Go to Appearance > Customize > Additional CSS.
- Add the following code to include your font:
@font-face {
    font-family: 'YourFontName';
    src: url('wp-content/themes/your-theme/fonts/YourFontName.woff2') format('woff2');
    font-weight: normal;
    font-style: normal;
}

body {
    font-family: 'YourFontName', sans-serif;
}
Replace 'YourFontName' with your font’s name and correct file path.
Step 3: Save and Test
- Save your CSS changes.
- Refresh your website to see the custom font applied.
3. Embedding Google Fonts
Google Fonts is a free library of web fonts that you can easily integrate into WordPress. Here’s how:
Step 1: Choose a Font from Google Fonts
- Visit Google Fonts.
- Browse and select a font.
- Click “Select this style” and copy the embed code provided.
Example:
<link href="https://fonts.googleapis.com/css2?family=Roboto:wght@400;700&display=swap" rel="stylesheet">
Step 2: Add the Embed Code
- Go to your WordPress Dashboard.
- Navigate to Appearance > Theme Editor.
- Open your theme’s
header.phpfile. - Paste the Google Fonts embed code inside the
<head>section:
<head>
    ...
    <link href="https://fonts.googleapis.com/css2?family=Roboto:wght@400;700&display=swap" rel="stylesheet">
</head>
Step 3: Apply the Font with CSS
- Go to Appearance > Customize > Additional CSS.
- Add the following code:
body {
    font-family: 'Roboto', sans-serif;
}
- Save the changes.
Now your website will use the Google Font you selected.
4. Adding Custom Fonts via the functions.php File
For developers who want a clean solution without plugins, you can add custom fonts using your theme’s functions.php file.
Step 1: Upload the Font Files
- Download your custom font files in
.woff2or.woffformats. - Upload the font files to your theme folder:
- Path:
wp-content/themes/your-theme/fonts/
- Path:
Step 2: Enqueue the Font in functions.php
- Open your theme’s
functions.phpfile. - Add the following code to enqueue the custom font:
function custom_fonts_enqueue() {
    wp_enqueue_style('custom-fonts', get_template_directory_uri() . '/fonts/custom-font.css');
}
add_action('wp_enqueue_scripts', 'custom_fonts_enqueue');
Step 3: Create a Custom Font CSS File
- Inside your theme’s
/fonts/folder, create a file namedcustom-font.css. - Add the following CSS to include the font:
@font-face {
    font-family: 'YourFontName';
    src: url('custom-font.woff2') format('woff2');
    font-weight: normal;
    font-style: normal;
}

body {
    font-family: 'YourFontName', sans-serif;
}
- Replace
'YourFontName'with your font’s name and file path.
Step 4: Save and Test
- Save all changes.
- Visit your website and confirm that the custom font is applied.
Tips for Choosing Custom Fonts
- Use readable fonts for body text (e.g., sans-serif like Roboto or Open Sans).
- Pair fonts that complement each other for headings and paragraphs.
- Avoid using more than two or three fonts to keep your design clean.
- Test fonts on different screen sizes to ensure consistency.
Final Thoughts
Adding custom fonts to your WordPress site can elevate your design and make your content more engaging. Whether you use a plugin, upload fonts manually, embed Google Fonts, or edit the functions.php file, the process is straightforward and achievable for both designers and developers.
Experiment with different fonts to find the perfect match for your brand and audience.
By following this guide, you can create a visually appealing and professional WordPress site with unique typography.
FAQs
How can I add custom fonts to my WordPress site?
You can add custom fonts using plugins, manually with CSS, embedding Google Fonts, or through the functions.php file. Each method ensures your site remains SEO-friendly and visually appealing.
Do custom fonts affect SEO rankings?
Custom fonts themselves don’t directly affect SEO, but their impact on site speed and user experience does. Use optimized font formats like .woff and .woff2 to maintain fast load times.
Are Google Fonts SEO-friendly?
Yes, Google Fonts are SEO-friendly as they are hosted on fast servers and optimized for web use. Properly embedding them ensures they don’t negatively impact page speed.
What should I do if my custom fonts don’t display correctly?
Ensure the font files are uploaded in web-safe formats and that the correct paths are used in your CSS. Check browser compatibility and add fallback fonts for SEO best practices.
Can I use multiple custom fonts on my WordPress site?
Yes, but it’s best to limit the number of fonts to two or three to maintain readability and site speed. Excessive fonts can increase load time and affect SEO performance.
Is it better to use a plugin or manual method for adding custom fonts?
Using a plugin is easier for beginners, while the manual method offers more control for developers. Both methods can be SEO-friendly when implemented correctly.


This Post Has 0 Comments